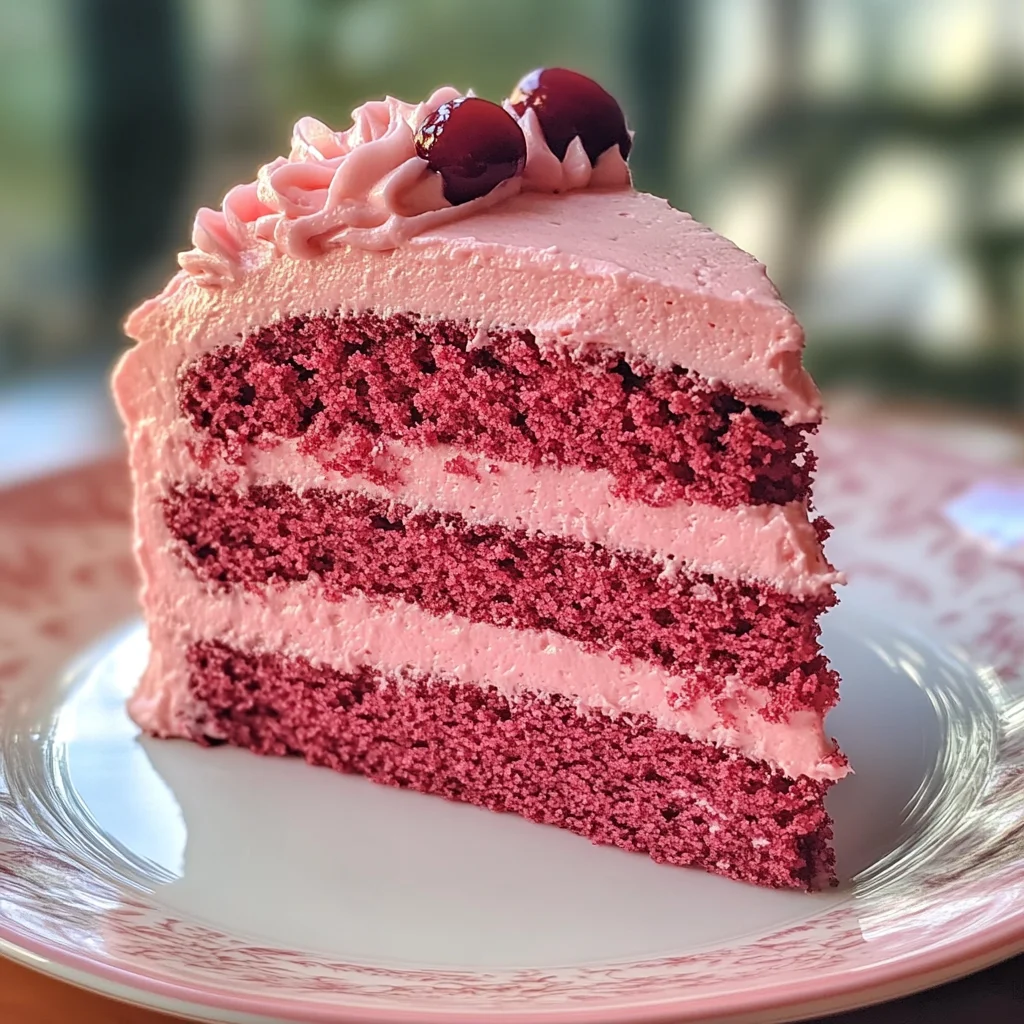
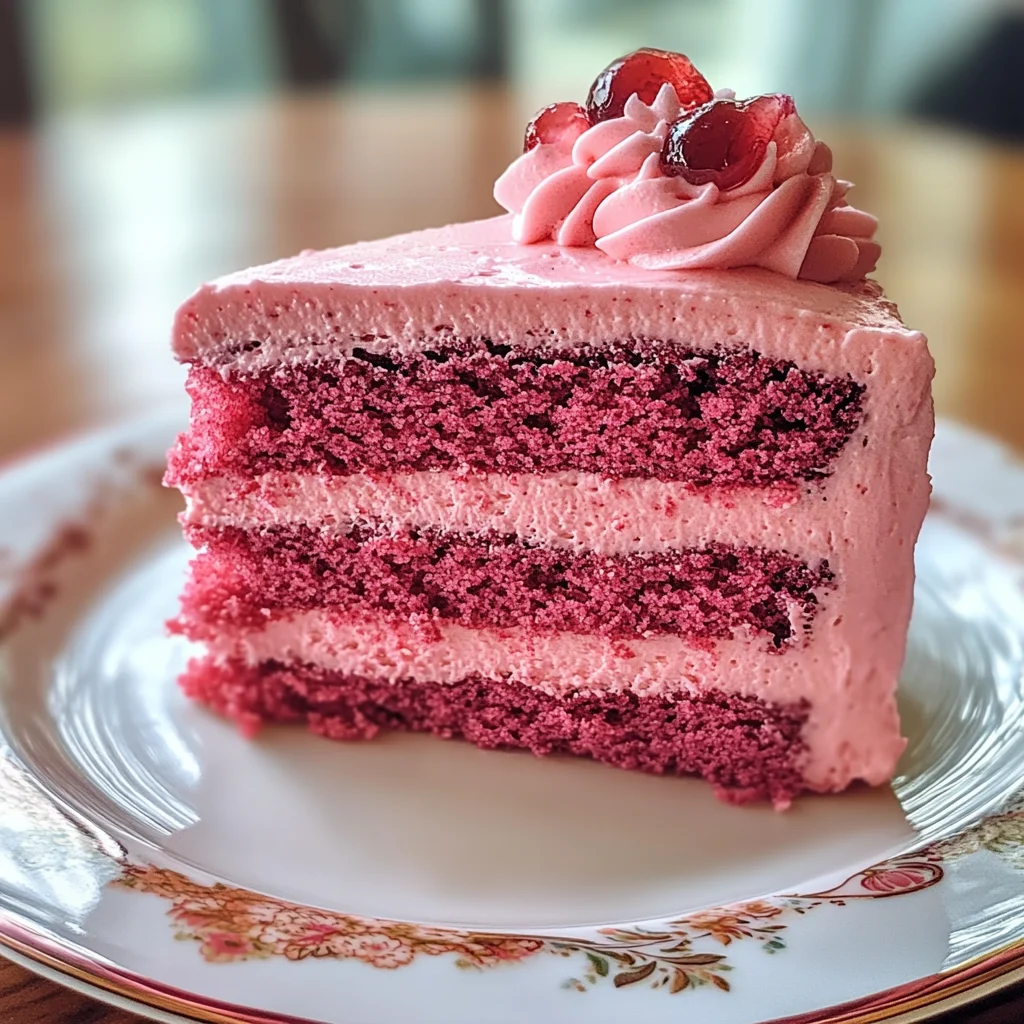
Mother’s Day Pink Velvet Cake
Celebrate the special women in your life with this enchanting Mother’s Day Pink Velvet Cake. If you’re looking for a show-stopping dessert that brings joy and sweetness to any gathering, you’ve come to the right place! This cake isn’t just pretty; it’s fluffy, rich, and packed with delightful flavors that will make your heart sing. Whether it’s for Mother’s Day or simply a cozy family dinner, this cake is sure to create sweet memories filled with love.
What makes this recipe even more special is its versatility. You can whip it up for birthdays, surprise friends with a sweet treat, or enjoy a slice on a busy weeknight. Trust me, once you share this cake, everyone will be asking for more!
Why You’ll Love This Recipe
- Easy to Make: With simple steps and common ingredients, you’ll find this recipe quick and straightforward.
- Family-Friendly Appeal: Its delightful flavor and beautiful pink color make it perfect for kids and adults alike.
- Make-Ahead Convenience: Bake the cakes ahead of time! They store well in the fridge or freezer until you’re ready to frost.
- Versatile Flavor Options: The base recipe allows you to get creative with flavors and toppings!
Ingredients You’ll Need
Let’s gather some simple, wholesome ingredients that are easy to find. Each one plays a key role in making your Mother’s Day Pink Velvet Cake incredibly delicious!
For the Cake
- 2 ½ cups cake flour
- 1 ¾ cups granulated sugar
- ½ cup unsweetened cocoa powder
- 1 tbsp baking powder
- ½ tsp salt
- ¾ cup unsalted butter, softened
- 4 large eggs (room temperature)
- 1 cup buttermilk
- 2 tsp pure vanilla extract
- Red food coloring (to achieve desired pink hue)
For the Frosting
- Cream cheese frosting (for topping)
Variations
This recipe is wonderfully flexible! Feel free to experiment and make it your own.
- Swap the buttermilk: Use yogurt instead of buttermilk for a tangy twist!
- Add almond extract: A splash of almond extract can elevate the flavor profile beautifully.
- Top with fresh fruit: Fresh strawberries or raspberries add a refreshing contrast to the rich cake.
- Use different food coloring: Get creative with colors! Try adding blue or green food coloring for a fun twist.
How to Make Mother’s Day Pink Velvet Cake
Step 1: Preheat Your Oven
Start by preheating your oven to 350°F (175°C). Greasing and flouring two 9-inch round cake pans is essential to ensure that your cakes come out perfectly without sticking.
Step 2: Mix Dry Ingredients
In a bowl, whisk together the cake flour, cocoa powder, baking powder, and salt. This step helps distribute all the dry ingredients evenly throughout your batter.
Step 3: Cream Butter and Sugar
In another bowl, cream together the softened butter and granulated sugar until light and fluffy—about three minutes should do it! This process incorporates air into the mixture, giving your cake its delightful fluffiness.
Step 4: Add Eggs
Beat in each egg one at a time. Make sure each egg is well incorporated before adding the next. This ensures that every bite of your cake has that rich flavor we all love!
Step 5: Combine Wet Ingredients
Next, add in the buttermilk, vanilla extract, and red food coloring. Mix until everything is combined beautifully! The red food coloring will give your cake its signature pink hue.
Step 6: Fold in Dry Ingredients
Gradually fold in your dry mixture from earlier until smooth. Be gentle while mixing; you want to keep that airy texture we worked so hard to create!
Step 7: Bake the Cakes
Divide your batter between the prepared pans. Bake them in the preheated oven for about 25-30 minutes or until a toothpick comes out clean when inserted into the center.
Step 8: Cool Down
Once baked, let them cool in their pans for about ten minutes before transferring them to wire racks. Allow them to cool completely—this prevents melting your frosting later!
Step 9: Frost Your Cake
Finally, once cooled completely, frost with cream cheese frosting generously on top of each layer. Feel free to decorate further with fresh fruit or sprinkles if you’re feeling festive!
Enjoy every bite of this lovely Mother’s Day Pink Velvet Cake—it’s bound to be a hit!
Pro Tips for Making Mother’s Day Pink Velvet Cake
Baking can be an adventure, and with these tips, you’ll ensure your Pink Velvet Cake turns out perfectly every time!
-
Use Room Temperature Ingredients: Bringing your eggs and buttermilk to room temperature helps create a smoother batter and ensures even baking.
-
Don’t Overmix the Batter: Mixing too much can lead to a dense cake. Stop mixing as soon as you see no dry flour to keep your cake light and fluffy.
-
Check for Doneness: Ovens can vary in temperature. Start checking your cake at the lower end of the baking time to prevent overbaking, which can dry it out.
-
Cool Cakes Completely: Letting your cakes cool completely before frosting is crucial. If they are warm, the frosting will melt and slide off, making a mess!
-
Add a Touch of Flavor: Experimenting with extracts or zest can elevate your cake. A hint of almond extract or lemon zest adds a delightful twist that complements the flavors beautifully.
How to Serve Mother’s Day Pink Velvet Cake
Presenting your lovely Pink Velvet Cake is almost as enjoyable as eating it! Here are some ideas to make serving even more special.
Garnishes
- Fresh Berries: Strawberries or raspberries add a pop of color and a burst of freshness that contrasts beautifully with the rich cake.
- Mint Leaves: A sprig of mint not only looks elegant but also brings a refreshing aroma to each slice.
- Edible Flowers: For an extra touch of charm, consider decorating with edible flowers, which will make your cake look truly spectacular.
Side Dishes
- Vanilla Ice Cream: The creaminess and sweetness of vanilla ice cream provide a lovely contrast to the moist cake, creating a classic dessert pairing.
- Fruit Salad: A light fruit salad made with seasonal fruits can balance the richness of the cake and offer a refreshing palate cleanser between bites.
- Whipped Coconut Cream: This dairy-free option adds a luscious texture and subtle sweetness that complements the flavors without overpowering them.
- Coffee or Herbal Tea: Serving coffee or herbal tea alongside your cake makes for an inviting experience, perfect for sharing stories and laughter around the table.
With these serving suggestions and tips, your Mother’s Day Pink Velvet Cake won’t just be delicious; it’ll also be an unforgettable centerpiece that celebrates love and joy! Enjoy every moment of baking and sharing this delightful treat.
Make Ahead and Storage
This Mother’s Day Pink Velvet Cake is perfect for meal prep, allowing you to enjoy its deliciousness even days after baking! With a few simple storage tips, you can keep it fresh and delightful.
Storing Leftovers
- Once the cake is frosted, cover it with plastic wrap or place it in an airtight container.
- Store the cake at room temperature for up to three days.
- For longer storage, refrigerate it, which will keep it fresh for up to one week.
Freezing
- To freeze the unfrosted cake, wrap each layer tightly in plastic wrap.
- Place the wrapped layers in a freezer-safe container or bag.
- Freeze for up to three months; when ready to use, thaw overnight in the refrigerator.
- Frost the cake once it’s completely thawed for best results.
Reheating
- If you prefer a warm slice of cake, preheat your oven to 350°F (175°C).
- Place a slice on a baking sheet and warm in the oven for about 10 minutes.
- Alternatively, heat individual slices in the microwave for about 20-30 seconds.
FAQs
Here are some common questions about making this delightful cake.
Can I make Mother’s Day Pink Velvet Cake ahead of time?
Absolutely! You can bake the layers ahead of time and store them as mentioned above. This makes it easy to frost and serve later!
What can I use instead of buttermilk in Mother’s Day Pink Velvet Cake?
You can substitute buttermilk with yogurt or milk mixed with a tablespoon of vinegar or lemon juice. This will give you similar acidity and moisture!
How do I achieve a deeper pink color for my Mother’s Day Pink Velvet Cake?
To achieve a richer pink hue, simply add more red food coloring until you reach your desired shade. Just be cautious not to overdo it!
Can I add fruit toppings to my Mother’s Day Pink Velvet Cake?
Yes! Fresh fruit like strawberries or raspberries makes a beautiful addition that complements the sweetness of the cake perfectly.
Is there a gluten-free option for this Mother’s Day Pink Velvet Cake?
Yes! You can substitute regular flour with a gluten-free all-purpose blend that includes xanthan gum for stability.
Final Thoughts
This Mother’s Day Pink Velvet Cake is more than just dessert; it’s a celebration of love and joy shared with those special women in our lives. I hope you find joy in making this recipe as much as you will enjoy sharing it. Remember, every slice tells a story filled with warmth and happiness. So gather your loved ones and let this enchanting cake create sweet memories together!
Mother’s Day Pink Velvet Cake
Indulge in the delightful flavors of our Mother’s Day Pink Velvet Cake – a stunning dessert that radiates love and joy! This enchanting cake, with its fluffy texture and rich chocolate undertones, is perfect for celebrating special moments. Its vibrant pink hue makes it an eye-catching centerpiece for any gathering, whether it’s a family dinner or a festive birthday party. With simple ingredients and straightforward steps, this recipe allows you to create sweet memories effortlessly. Top it off with luscious cream cheese frosting and fresh fruit for a refreshing twist.
- Prep Time: 20 minutes
- Cook Time: 30 minutes
- Total Time: 50 minutes
- Yield: Serves approximately 12 1x
- Category: Dessert
- Method: Baking
- Cuisine: American
Ingredients
- 2 ½ cups cake flour
- 1 ¾ cups granulated sugar
- ½ cup unsweetened cocoa powder
- 1 tbsp baking powder
- ½ tsp salt
- ¾ cup unsalted butter, softened
- 4 large eggs
- 1 cup buttermilk (or yogurt)
- 2 tsp pure vanilla extract
- Red food coloring
Instructions
- Preheat your oven to 350°F (175°C) and prepare two 9-inch round cake pans by greasing and flouring them.
- In one bowl, whisk together the cake flour, cocoa powder, baking powder, and salt.
- In another bowl, cream the softened butter and sugar until light and fluffy.
- Add eggs one at a time, ensuring each is well incorporated.
- Mix in the buttermilk, vanilla extract, and red food coloring until combined.
- Gradually fold in the dry mix until smooth.
- Divide the batter between pans and bake for 25-30 minutes or until a toothpick comes out clean.
- Let cakes cool before frosting generously with cream cheese frosting.
Nutrition
- Serving Size: 1 serving
- Calories: 350
- Sugar: 30g
- Sodium: 200mg
- Fat: 18g
- Saturated Fat: 10g
- Unsaturated Fat: 6g
- Trans Fat: 0g
- Carbohydrates: 45g
- Fiber: 1g
- Protein: 4g
- Cholesterol: 70mg